Multiple exposure exercises to keep your imagination awake
- Dec 1, 2025
- 7 min read
Last time we talked about assignments for single shots: now, let's make the things a little trickier and see how we can play with multiple exposure.
I use these exercises when my imagination starts being lazy and refuses to move. These challenges might bring you to some (well...actually a lot!) disasters, a few good shots and maybe one or two images that make you jaw drop. That means they worked.
Here are six multiple exposure self-assignments, but before we jump into the exercises, let's have a look on how the blending modes work.
Most cameras give you several blending modes, with each of them giving different results. I use Nikon camera and here we have 4 blending modes:
• Average – the camera takes all the exposures and balances them evenly, creating a smooth, harmonious mix.
This is one of my favorite ones and works well in most of the situations during both day and night. Sometimes I find the outcome too plain, so when I want images with more contrast or bolder colors, I try other modes.
• Add – the exposures are stacked so that everything gets brighter. Each exposure contributes extra light so the image can quickly become radiant.
I enjoy using this mode when I am looking for a sense of energy because it can transform simple scenes into glowing compositions, but sometimes the light can be too much.
• Light – only the lighter areas of the exposures show up.
I use it mes when I want a dreamy atmosphere, but sometimes can bring to unpredictable results, so I don't use it very often.
• Dark – only the darker areas of the exposures appear, perfect for silhouettes and layering shapes against lighter backgrounds.
I love using it during sunny days or whenever I find bold colors and sharp contrasts. At night it is usually too extreme since it produces photos that are almost completely black.
For these exercises we will mainly use Average and Dark, but feel free to experiment with all of them. There are no rules here and no limits for experimenting.
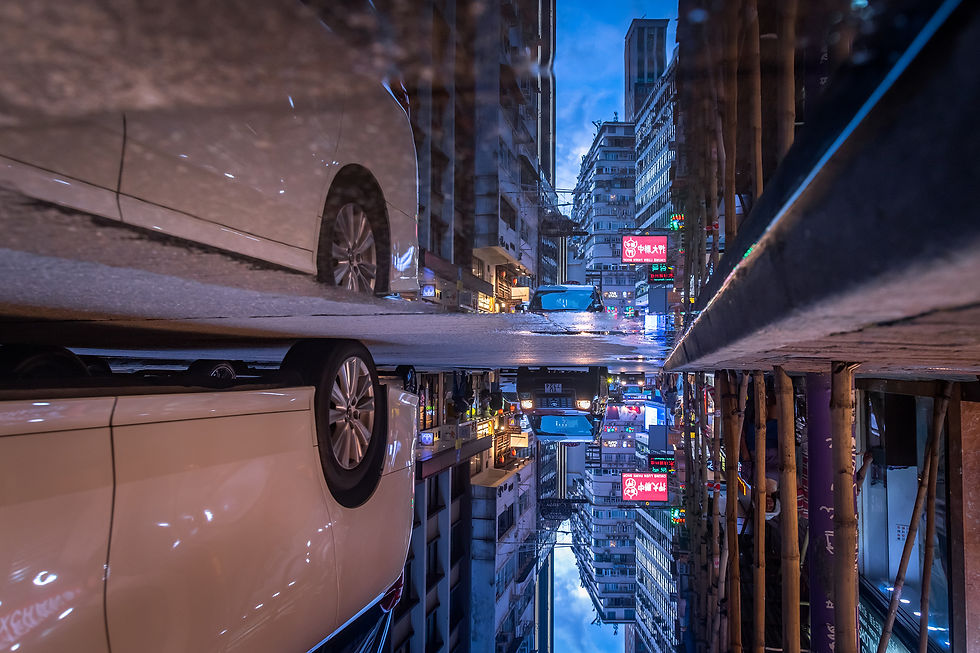
1. Urban twist
Take two shots of a cityscape and combine them in a single frame, at 180 degrees or 90 degrees from the other: by combining cityscapes shot at 90 or 180 degrees you learn how lines and shapes can interact and build a narrative in your image.
This is probably one of the easiest exercises when you start practicing multiple exposure and when I first experimented with it, this approach gave me the energy and confidence to keep pushing forward with this technique.
Tips and ideas:
• Pick a spot with strong lines or repeating patterns, like facades, bridges, windows: geometry will be your best friend here;
• After taking the first shot of the scene, tilt the second one at 180° for surreal and symmetrical results or try 90° for a more dynamic look where vertical and horizontal lines create visual tension;
• Modes: To make the final shot clean and readable, Average mode works better in most cases.

2. The 360° city
And let’s make things harder now. If folding the city in half wasn’t confusing enough, try folding it in every possible direction: take 4 shots, rotate each one 90° apart, until you complete a full 360° circle, then let your camera stitch together.
You can get an hypnotic cityscape where streets point in every direction and buildings loop around the frame. The image can look almost like a mandala made of architecture or a city collapsing into itself.
Tips and ideas:
• A wide-angle lens helps you catch more structure in each frame. Think 24mm or wider if you can;
• Use manual mode and keep the same exposure for all the shots, so the tones stay consistent and you will avoid sudden brightness discontinuity in your final image;
• Rotate around a central point to keep a sense of continuity, so all the surrounding lines and shapes radiate around it. This creates a balanced, harmonious composition even if the city is chaotic;
• Modes: Here you can experiment with Average mode, but Dark can also produce interesting results, like in the image below.

3. Through my eyes
Now it is time to get a bit more psychological. The goal is to dig beneath the surface and show what your subject might be thinking, dreaming or hiding in his mind
Pick a subject and take the first shot, then look for writing, funny texts, objects or anything around you that can hekp to convey a message. Combine it with your subject so it looks like they are actually thinking or imagining that particular thing. The more unexpected or ironic the combination, the more interesting the result.
Tips and ideas:
• Keep the first shot simple and well-lit so your subject stands out;
• When shooting the second image, consider where you want the “thought” to appear relative to your subject. Align it so the overlay feels like it’s emerging from their mind (for example, just above his head or next to it) rather than randomly floating in the frame;
• Choose objects, text or patterns that are easy to identify. Blurry or complex elements can confuse the viewer and reduce the impact of your image;
• Modes: Average mode works well because it evenly combines the subject and the “thought” element without overexposing or underexposing either layer, but again: I encourage you to experiment with other blending modes to achieve more dramatic or surreal effects.

4. The city in motion
In this exercise, the goal is to convey motion and energy: here we are capturing the pulse and energy of the streets around you.
Take several exposures of the same spot while the city moves around you, so let cars streak across the frame, pedestrians drift through the scene, etc. The final image should feel alive, as if the city itself is breathing, pulsing, and moving around you.
Tips and ideas:
• Choose a place with visible movement, like a busy crossing, a market, a square and remember: people are our best allies here for a dynamic, successful shot;
• Start by taking two shots of the same scene with people moving. Slightly shift or zoom the camera in the second shot. This will create a nice effect on the crowd, while keeping the overall structure of the scene;
• You can be satisfied with the shot you have now, or try a more advanced version, in which you combine the shots you just took with one using panning to follow a moving subject (see the example below). So, consider adding this or other ICM (Intentional Camera Movement) for one of the shots: it will make your life more complicated, but it’s a powerful tool to convey motion and energy in the scene;
• Modes: We want all the shots to blend eveny among each other, so Average mode is probably your best choice to start with.

5. The space traveler
This exercise is about capturing one or more subjects in different space within the same frame, as if they exist in several moments at once and trust me: the results can be quite funny and surreal at times!
It could be a pedestrian crossing the street, someone walking along a geometric wall or a dog running across the frame. We have to let the subject move through the scene while keeping the background still.
Tips and ideas:
• For a better result, try combining 2 to 3 shots together depending on the complexity of the motion (more than 3 can make your image too messy);
• Identify your background, which will be the same for all the shots and think about where and how the subject will move through the frame to create a clear and interesting sequence;
• You can keep the camera in the same position or slightly move or zoom it in the second shot. This will make your subject appear at different sizes between shots, often creating surprising and surreal effects. Do not chase perfection or precision, some accidental ghosting or overlap often adds character to the final image;
• Consider using a slower shutter speed if you want slight motion blur in each layer (like 1/60 or below);
• Modes: Here, pretty much all the modes can work, but start trying it with Average and Dark.

6. Urban collisions
This exercise is about trusting your instinct and letting two unrelated images meet in a single frame. In particular, think of a cityscape colliding with a texture: it can be a peeling paint, cracked asphalt, a ripped poster, etc. and let your imagination decide how they collide.
Tips and ideas
• Start with a clean cityscape for your first exposure. Then add the texture for the second, experimenting with different angles or distances to create surprising overlays;
• Choose your second surface and overlap it with the first shot: the more texture the surface has, the more interesting the result will probably be. I personally love rough, grungy surfaces because they add depth and a tactile quality, transforming a simple cityscape into something visually striking;
• Try also changing focus between the two shots, keeping the city sharp and the texture slightly out of focus to create depth and a dreamlike image;
• Modes: Use Dark mode to create more graphic results, with sharper edges and colors. For this assignement this is probably my favorite mode, but Average works pretty well too.

And you? Which of these assignments do you think would be the most interesting to try and how would you experiment with it?


Comments